One of the few things that I enjoy about the coming winter months and nightfall happening earlier is the ability that gives to have candlelight dinners.
I have so many memories of candlelight dinners. Birthdays, my parents anniversaries, and those begged for candlelight dinners for no reason at all.
The soft light. The cloth napkins. The playing with fire.
Have you had a candlelight dinner lately?
Tuesday, September 20, 2011
Saturday, September 17, 2011
Mini Chocolate Silk Pies

Decadence is chocolate silk pie. No joke. It is simple, rich, sweet, and calorie rich. But it is worth it.
I have made this a few times with different recipes, and the recipe is always almost exactly the same. This time, I took a bit of creative license and came up with something delicious.
Melt and allow to cool to room temperature:
2 oz. of unsweetened baking chocolate.
Cream until light and fluffy:
1/2 cup butter (salted creates a more complex flavor)
3/4 cup sugar.
Add:
Cooled chocolate
1 tsp vanilla
Add and beat one at a time for five minutes:
2 eggs*
Distribute into 6 mini graham cracker crusts and refrigerate for 2 hours.
Right before serving, whip 1 cup of whipping cream, 1 T powdered sugar, and 2 t of your favorite liqueur. I used a fig cognac liqueur. Put a dollop of whipped cream on each mini-pie.
Use a micro-plane to shave bittersweet chocolate over the top of each. Serve. Enjoy.

*If you are concerned about using raw egg, you can pasteurize your eggs by following this process. Be careful to follow it exactly, or your eggs will cook!
Tuesday, September 13, 2011
Full Circle: Caper and Beef Toast
When I lived in Denmark during college, I cooked. Often. I get comfort from cooking, and I was blessed to live with a woman, now a close friend, who was more than happy to share her kitchen with me. I think I left the country knowing, in Danish over 100 food names... and not much else.
Anyway, the woman I lived with, whom my daughter now calls "Gramma Tina, " taught me how to make a few things, one of which was beef and caper toast. She learned it from a friend who had learned how to make it as a nanny in the United States. And I have brought it back again. Today I'd like to share it with you.
Until this simple dish, I was not a huge caper fan, but their tangy saltiness is the perfect foil for the beef and onion, and all f the ingredients work together to make heaven in your mouth. So, without further ado:
Caper and Beef Toasts
First, in a bowl, mix until just combined:
1 lb. lean ground beef (the leaner the better in this case)
1/2 large onion chopped
1/4 cup capers (or more)
1/4 tsp salt
pepper to taste
1 raw egg


We use gloves in our house, not because meat is gross, but because it is cleaner feeling:


 Serve hot with your favorite soup and/or salad. We had ours with this Strawberry Fennel salad, and it was great!
Anyway, the woman I lived with, whom my daughter now calls "Gramma Tina, " taught me how to make a few things, one of which was beef and caper toast. She learned it from a friend who had learned how to make it as a nanny in the United States. And I have brought it back again. Today I'd like to share it with you.
Until this simple dish, I was not a huge caper fan, but their tangy saltiness is the perfect foil for the beef and onion, and all f the ingredients work together to make heaven in your mouth. So, without further ado:
Caper and Beef Toasts
First, in a bowl, mix until just combined:
1 lb. lean ground beef (the leaner the better in this case)
1/2 large onion chopped
1/4 cup capers (or more)
1/4 tsp salt
pepper to taste
1 raw egg


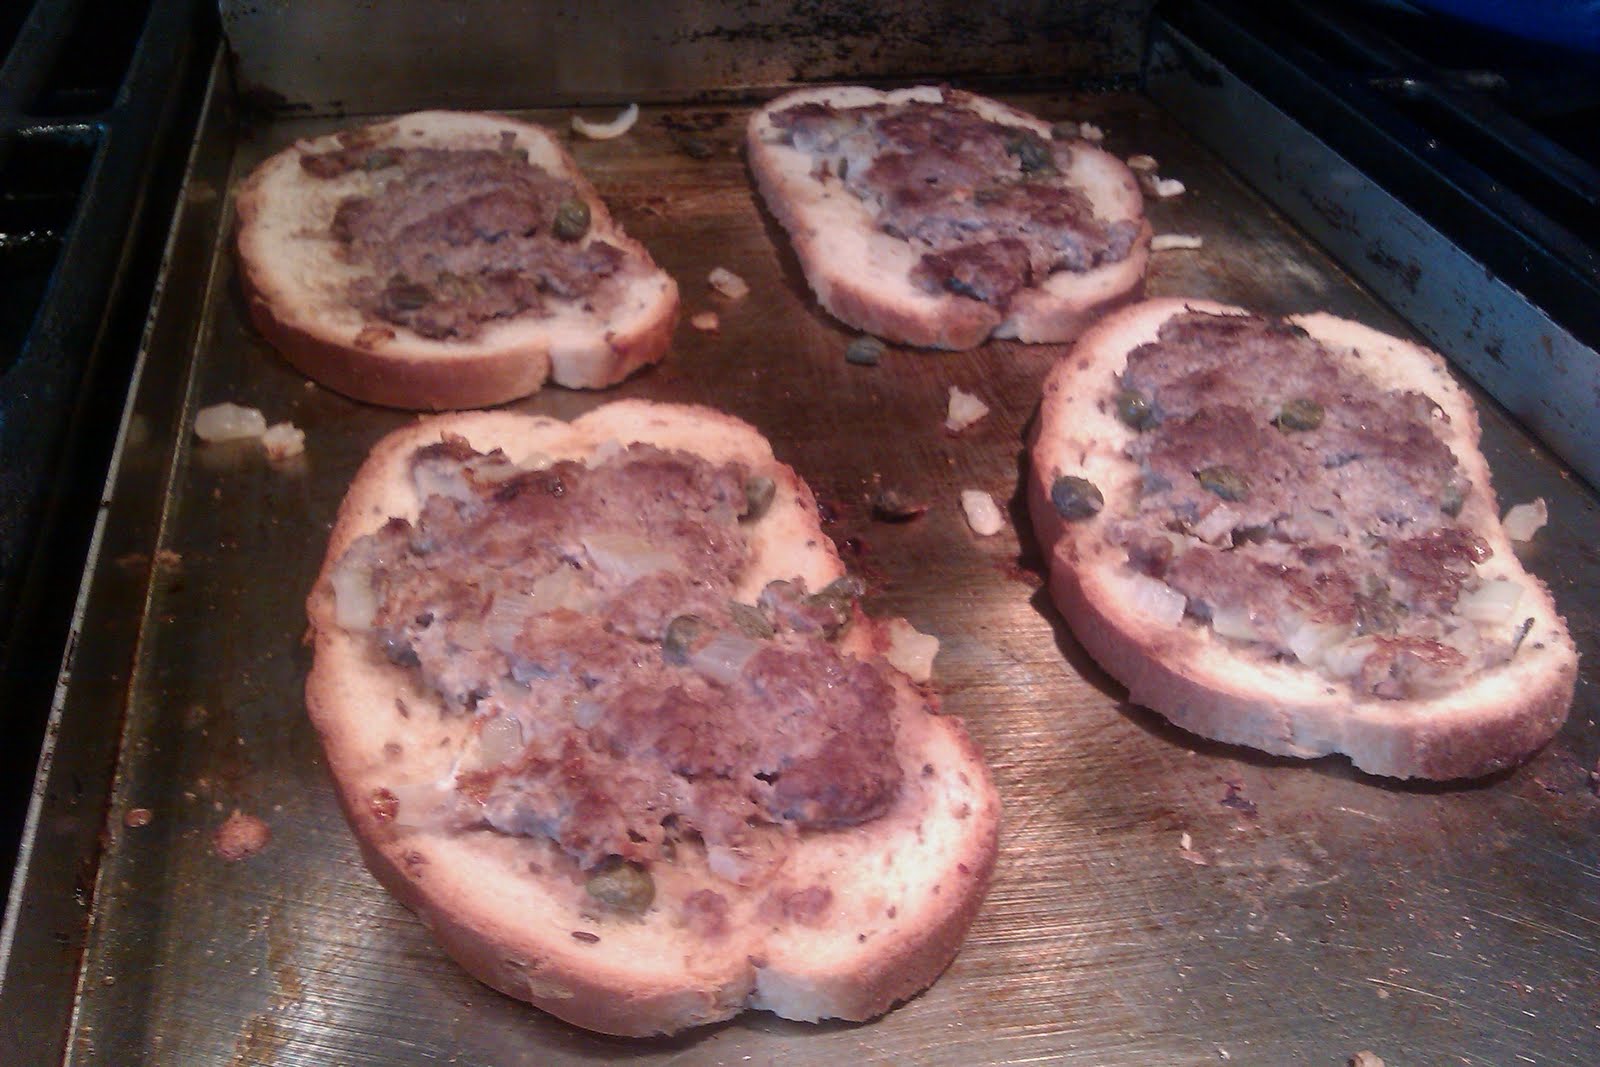
Lay out 8 pieces of bread. We have found sourdough and rye to be the most delicious, but your favorite bread would work great too!

Equally portion the meat mixture onto the bread, and then spread it out evenly over the entire piece of bread.

Preheat your griddle(s) over medium/low heat and place your bread, meat side down on the pan(s).

Allow to brown, for about 5-7 minutes, until the meat has a nice brown color. Flip and allow the bread to toast on the griddle.
 Serve hot with your favorite soup and/or salad. We had ours with this Strawberry Fennel salad, and it was great!
Enjoy!
Strawberry Fennel Salad

This salad was a wonderfully light and sweet salad with a crunch that would make a delicious accompaniment to any savory meal.
Put any young tender lettuce in your salad bowl and top with:
thinly sliced hothouse cucumbers
5 thinly sliced strawberries
About 1/4 cup shaved raw fennel root
1 green onion, tops only, chopped
Drizzle with Honey White Balsamic Vinaigrette to taste:
whisk
1 Tablespoon honey
3 T White Balsamic Vinegar
a pinch of salt
Briskly whisk in, a drizzle at a time:
6 T Canola, Grapeseed, or Vegetable oil
Enjoy!
Friday, August 19, 2011
Dinner Tonight
 |
| Caprese Salad with homegrown tomatoes and basil and fresh mozarella, drizzled with olive oil and balsamic and sprinkled with salt |
 |
| Homemade crab and pancetta raviolis, cheese raviolis and heirloom tomatoes |
 |
| garlic infused oil toasted on rustic bread slices |
 |
| The sauce was garlic and oil with basil chiffonade and heirloom tomatoes added as it was removed from the heat. |
 |
| Homemade Caesar with a lime caesar dressing (substitute lime for lemon in any caesar dressing... yummmm) |
Saturday, August 13, 2011
Spanish Rice Risotto

Rice:
1 1/2 cups arborio rice
1 T olive oil
1/2 finely chopped onion
1 clove crushed garlic
1/2 tsp salt
1/4 tsp cumin
a sprinkle or two or three of Cumin to taste
Broth:
6-7 cups of broth/stock (if stock, you may need more salt)
1 can tomato paste
a splash or two tequila (optional)
Finishing:
1/3 cup sour cream
1/4 cup chopped green onions
1/3 cup grated queso fresco
First, combine your stock and tomato paste and bring to a simmer.

Start the rice by lightly toasting the arborio rice with your onions and olive oil. The rice is ready when you start to see a light brown toasty color on at least half of the grains of rice. You will also notice the rice grains becoming slightly translucent. Add the cumin, salt, garlic and chipotle and allow to become fragrant.

As is the case with any risotto, add the broth about 1 cup at a time, stirring upon addition and allowing to simmer uncovered until more liquid is needed. I have included two videos below. The first shows what the risotto should look like right after an addition of broth. The second shows what it should look like just before more broth is added.
If, as you draw your spoon through the risotto, it falls immediately back in place, allow it to keep cooking. If it is slow moving and allows you to see the bottom of the pan, it is time to add more broth.
Continue adding on cup of broth at a time until you have added 5 cups. At that point, begin testing the risotto for a soft, but still al dente texture.

When your risotto has reached the desired consistency, add a bit more broth to loosen it and the sour cream once you have turned off the heat. Put into a serving dish, preferably a large shallow dish and garnish with the cheese and green onions. Serve!


I hope you enjoy!
P.S. If you want to make your risotto a little in advance, remove from heat when it is almost done, and allow it to sit until you are ready to serve. Heat, add broth to bring to desired consistency, finish and serve.
Thursday, July 14, 2011
Killer Sandwiches

Anyway, the other night I made these killer sandwiches, and had to immortalize them forever here, and share them with you. Warning: the amount of brie on one of these things might put you six feet under.
 |
| Arugula, Brie, Chutney, Prosciutto and Egg Sandwich on Parmesan Ciabatta |
Start your chutney:
In a skillet, saute 1/2 finely chopped onion and one clove of chopped garlic briefly in 1 T olive oil. Add 1 large chopped tomato (heirloom is really good). Sprinkle with salt, 1/2 T of sugar, and 2 T of white balsamic. Simmer until the moisture evaporates and the mixture starts to caramelize. While this is happening, you will have just enough time to do the rest of the sandwich prep.


As son as your chutney is cooking, place four sliced ciabatta rolls face down on a large buttered griddle on medium heat. Allow to toast.
Slice up your brie so that it looks like this (although this is enough for about 6 sandwiches):

Notice I sliced it diagonally and left on all the rind for flavor. I then cut each of the three longest slices in half. Each sandwich will need 1 and a half slices of brie.
As soon as the bread is browned, put your eggs on to fry. I like to use ring molds to keep my eggs smaller, and I personally like to leave the yolks runny so they create a kind of sauce. Feel free to fry your eggs the best way that works for you. Don't forget to salt and pepper your eggs though.


As your eggs fry, stack your sandwiches:
Brie

Chutney

Egg and Prosciutto

Arugula

Bread

DELICIOUS
MESSY
FATTENING
PERFECT
gone.

I hope you enjoy!
Tuesday, July 12, 2011
Potato Potato
1. Mashed potatoes, hash browns, and potatoes au gratin are not exactly "light" fare.
2. During the late 90's, many sweet potato farmers were on the verge of growing something else. After all, the only time anyone ever ate sweet potatoes was on Thanksgiving when they had all the flavor boiled out of them and then were coated in a heavy layer of butter and sugar.
3. People realized that sweet potatoes are amazing. They taste great and they are incredibly good for you.
When I was growing up, a fairly common breakfast was sweet potatoes that had been slow baked over night. The sugar had caramelized, the potatoes were soft. They made an amazing breakfast!
I have done many many things with sweet potatoes over the years. They are great cubed and par-cooked in salad. They rock the house as a side lightly mashed with cranberries, caramelized onions and toasted pecans. They are incredible grilled on the stove top or out on the barbecue. At the same time, sometimes they are a bit too intensely flavored for my taste buds that day. A couple of years ago, I was inspired: what would happen if I mixed sweet potatoes with good old fashioned russets?
Magic. Magic happened.
Sweet potato and potato mash. Sweet potato and potato twice baked. Sweet potato and potato hash browns. Sweet potato and potato au gratin. IN-CRED-I-BLE.
So let me tell you about these dishes. They are lower fat. Why? Well, so often, to make potatoes moist and delicious, what do we add? Cream, butter, oil, milk, cheese. These are all ingredients that I love, but they don't always love my waistline. But when I use sweet potatoes along with regular potatoes, there is a higher level of natural moisture present. In addition, the sweetness of the potato is heightened by the sweet potato. The addition of the sweet potato also adds a beautiful orange color and a complexity of flavor.
Before you go off and try these, let me make a few suggestions: first, if you are going to cook them for mashed potatoes, steam them above the boiling russets. Second, if you usually use a lot of cheese in a recipe, back WAAAAY off if you are going to add sweet potato; sauteed onion is a great addition instead. Lastly, don't parboil your sweet potatoes, even if you are going to do so to your white potatoes; they cook faster and they don't need it.
Lastly, here is a recipe to get you started:

Twice Baked Sweet Potato-Potato
-Bake 4 Russets and 2 Sweet Potatoes
-Gently remove the potato from the skins, leaving shells from the russets behind.
-Rice the potatoes into a bowl (you can just mash them if you don't have a ricer)
-Stir in 1/4 stick melted butter, 1/2 block cream cheese, and 1/2 cup sour cream
-Re-fill the russet shells with the mixture and lightly sprinkle with cheese of your choice.
-Bake at 350-400 for about 10 minutes or until top has melted or lightly browned

Enjoy experimenting!
Saturday, July 9, 2011
Apricot Berry Upside Down Cake
Who doesn't like upside down cake? I am sure those people are out there, but not me! I think it is fun, pretty and fairly easy too. Have you ever made an upside down cake? Here are the steps I took to make my upside down cake last night, and not only was it GORGEOUS, but it was delicious too.
1-- Pour 1/4 cup melted butter into the bottom of a 12 inch circular cake pan.
2-- Sprinkle a few tablespoons of brown sugar over the bottom of the pan and mix the two together.
3-- Cut 4 apricots in half, removing their pits and arranging them in the bottom of the pan.
4-- Arrange a handful of berries (I used boysenberries, but raspberries or blackberries would be excellent) around the apricots

5-- Gently pour your favorite cake batter over the top. (For my purposes, I used a white cake mix and added vanilla to the batter.
6-- Bake until the toothpick comes out clean.

7-- Flip onto a plate, and allow to cool.
8-- Slice with a sharp knife and serve. I served this one with a vanilla bean whipped cream.

Enjoy!
Tuesday, July 5, 2011
Honey Citrus Glazed Chicken
Ahh, summer, barbecued chicken. Okay, I must admit, in our family we grill year round. But I do love summer and the barbecue. Tonight's dinner was CSA heavy. I barbecued an organic, locally sourced, pasture raised chicken from here. I also sauteed kale from a local farm from whom I get a box of produce a few times a month. Lastly, I used a blood orange from a farmer in San Diego that brings up beautiful citrus and avocados twice a month.
I feel so healthy and supportive of local agriculture! Okay, I'll stop congratulating myself now.
Anyway, on to the food!


The skin was perfectly crunchy and brown, the fat was rendered, and the glaze was sweet, spicy and salty. Mmmm. Yummy.
I even cooked the back, and here is the thing, with a 69 cent per pound chicken I wouldn't. no way. not worth it. nope. But with a pasture raised chicken, the meat is more expensive, and the best little bits of meat that are on the back have been more developed. Not only is it worth it, the back is also delicious when the chicken has been raised right.

And as a quick afterthought, the Swiss chard was lightly sauteed in caramelized onions and dressed with the other half of that blood orange. Great side!


I feel so healthy and supportive of local agriculture! Okay, I'll stop congratulating myself now.
Anyway, on to the food!

I brined, smoked and grilled the chicken. At the end of it's time on the grill, I coated it with this glaze:
Juice of 2 limes
Juice of 1/2 blood orange (regular orange would be a great substitute)
1 T olive oil
2T honey
1/4 tsp chipotle powder
1/2 tsp salt
1 head of finely minced garlic

The skin was perfectly crunchy and brown, the fat was rendered, and the glaze was sweet, spicy and salty. Mmmm. Yummy.
I even cooked the back, and here is the thing, with a 69 cent per pound chicken I wouldn't. no way. not worth it. nope. But with a pasture raised chicken, the meat is more expensive, and the best little bits of meat that are on the back have been more developed. Not only is it worth it, the back is also delicious when the chicken has been raised right.

And as a quick afterthought, the Swiss chard was lightly sauteed in caramelized onions and dressed with the other half of that blood orange. Great side!


Monday, July 4, 2011
Biscuits or Cinnamon Rolls? Both.
For as long as I can remember, our family has enjoyed several pans of ooey gooey caramel pecan rolls every Christmas morning. My Dad wakes up early, starts the dough, and about 10:00, out of the oven come a great big pan or two of pure heaven.

We also tend to enjoy fresh, homemade buttermilk biscuits on a fairly regular basis. Sometimes we eat them with chicken gravy, sometimes with honey, sometimes with homemade boysenberry jam. Any of those choices are quite tasty.
If you have never made biscuits from scratch,--really from scratch, you know, using flour and butter and buttermilk-- you really ought to give it a try. Once you give it a try, you might be hooked.
Anyway, what does all of this biscuit talk have to do with cinnamon rolls? Well, I recently decided to combine the two (yes I MAY have been inspired by that ever famous giggling dough-boy found in the refrigerator section at the grocery store). I have made these a few times, and they are quite yummy. So, here goes:
First, make biscuit dough (this is my families favorite recipe, but if this totally overwhelms you, use a mix!):
mix:
1 3/4 cup all purpose flour
1/2 tsp salt
2 tsp baking powder
1 tsp sugar
1/2 tsp baking soda
cut in:
1/4 cup butter
add and mix until just combined:
3/4 cup buttermilk
Gather together:
1/3 cup butter melted (I know I know it's a lot of butter, I apologize to your cholesterol and notice I said I only make these occasionally)
1/2 cup brown sugar
1 T and 1 T cinnamon
coarsely chopped nuts (pecans are best) if desired
Now here comes the fun part. On a floured surface, roll out your biscuit dough into a rectangular shape about 1/4-1/3 inch thick.

Brush the dough with a little bit of the butter.
Sprinkle the dough with a few tablespoons of brown sugar and 1 T of cinnamon.


Pour the remaining melted butter into a square glass, metal or stone baking dish (I actually use a small rectangular dish but it must be smaller than 9x13) Sprinkle the rest of the brown sugar, the cinnamon and the nuts in the pan.


Roll the dough along the longest edge.


Cut the dough into pinwheels and arrange in the pan with space between. This is biscuit dough, so it is rather delicate and soft. If you have any breakage just patch it together as best as you can.


Bake in a 450 degree preheated oven for 12-15 minutes. Notice how the biscuits expands as they cook, so all the spaces are filled in.


Remove from oven, and immediately invert the pan onto foil lined cook sheet.


Serve! I hope you enjoy.
Subscribe to:
Posts (Atom)