Showing posts with label side dish. Show all posts

Saturday, November 19, 2011

Jalapeño Bourbon Cranberry Sauce


I was inspired by Bobby Flay on Iron Chef a few years ago and this cranberry sauce has become an addition to our yearly Thanksgiving feast.  It may sound odd.  It may be a bit scary.  I encourage you to try it.

Cranberry Bourbon Vanilla Jalapeño Sauce

1 bag cranberries (I like to add a few extras, like a third of a bag or so)
1/3 cup water
2/3 cup bourbon
1 roasted/seeded/de-veined red jalapeño, finely chopped (these are sometimes called fresno chilies)
         *I usually taste test my chile to make sure it isn't too hot, but the sugar in the sauce tends to counteract    
           the heat
1 vanilla bean
1 cup sugar

Tuesday, November 15, 2011

Asparagus

Man oh man, between teaching and being a mom and other things, I haven't been able to blog much of late.  Today's is little, but delicious nonetheless.

Tonight, I was a bit naughty with our vegetables.  You see, we had a potato bar for dinner last night, complete with bacon as a topping, so I absconded with the bacon grease.  GASP!  Not that I'd want to make cooking with that stuff a habit, buuuut...

I had some beautiful asparagus tonight.  I wedged an onions, heated the bacon grease, and started the onions cooking.  Then, after snapping the tough ends off of the asparagus, I added that to the party.  It all cooked for about 8 minutes because the asparagus was on the thicker side.  Here it is served:


What is your favorite easy vegetable?  Do you do anything to make it special on occasion?

Sunday, September 25, 2011

Artichoke Cups with Lemon Butter Mayonnaise


I love artichokes.  I have for as long as I can remember.  I love them steamed, plain, dipped in butter, fried, in dip, with mayo, for lunch or as an appetizer.  Any way they can be cooked, they are delicious.  They are also pretty.  Don't you think?  We are pretty much at the end of fresh artichoke availability, but I had to make them tonight anyway.  And I went with a fun presentation.  I made homemade mayonnaise and then hollowed out the center, filling it with the mayo.

Delicious!

First, trim and steam your artichokes.  I always cut off the tips of the outside leaves with a pair of scissors.  Not only does it make the artichokes more attractive, but it makes them less dangerous too!

As your artichokes steam, make your mayonnaise.

Melt 1 stick of butter.

Put one egg yolk, a pinch of salt and a tsp of dijon mustard in a large bowl.  Whisk (I like to use a hand mixer) the egg and mustard briskly.  Slowly (only a drizzle at a time) add the melted butter, allowing it to emulsify into the egg before adding more.  When half of the butter has been added, add the juice of 1/2 a lemon or lime and a sprinkle of Chipotle powder if desired.  Finish whisking in the rest of the butter, adding gradually.


You should have a thick and creamy sauce.  (If you want a thicker mayo, you will need to add more oil or butter).  I have found these proportions to be just right for this application.


When your artichokes are soft but still firm (after 30-45 minutes of steaming), gently pull the leaves out from the center.  Remove the center leaves and choke using a teaspoon.  Fill the center with about a tablespoon of the mayonnaise and serve!


Enjoy!


Two Potato Gratin (aka pommes anna)


added note: after posting this, I have since learned of a dish called pommes anna that I had never heard of or eaten (but I guess re-created with a twist).  This dish is much more of a pommes anna than a gratin, but it is still amazing.

Lightly sweet, perfectly browned, with a hint of caramelized onion, this gratin makes an impressive looking and wonderful tasting accompaniment to any autumn or winter meal.  It is fairly easy to prepare, but beware!  This one takes some time to bake.


2 Sweet potatoes, scrubbed
3-5 Russet potatoes, scrubbed
1 medium onion
1/3 cup cream
3 T butter
Salt
Onion Powder


 Slice your onions in thin 1/2 or 1/4 slices.  I always keep the skins attached so that I can use it as a handle when I get down toward the root end.  Caramelize your onion in 1 T of butter and a sprinkle of salt.


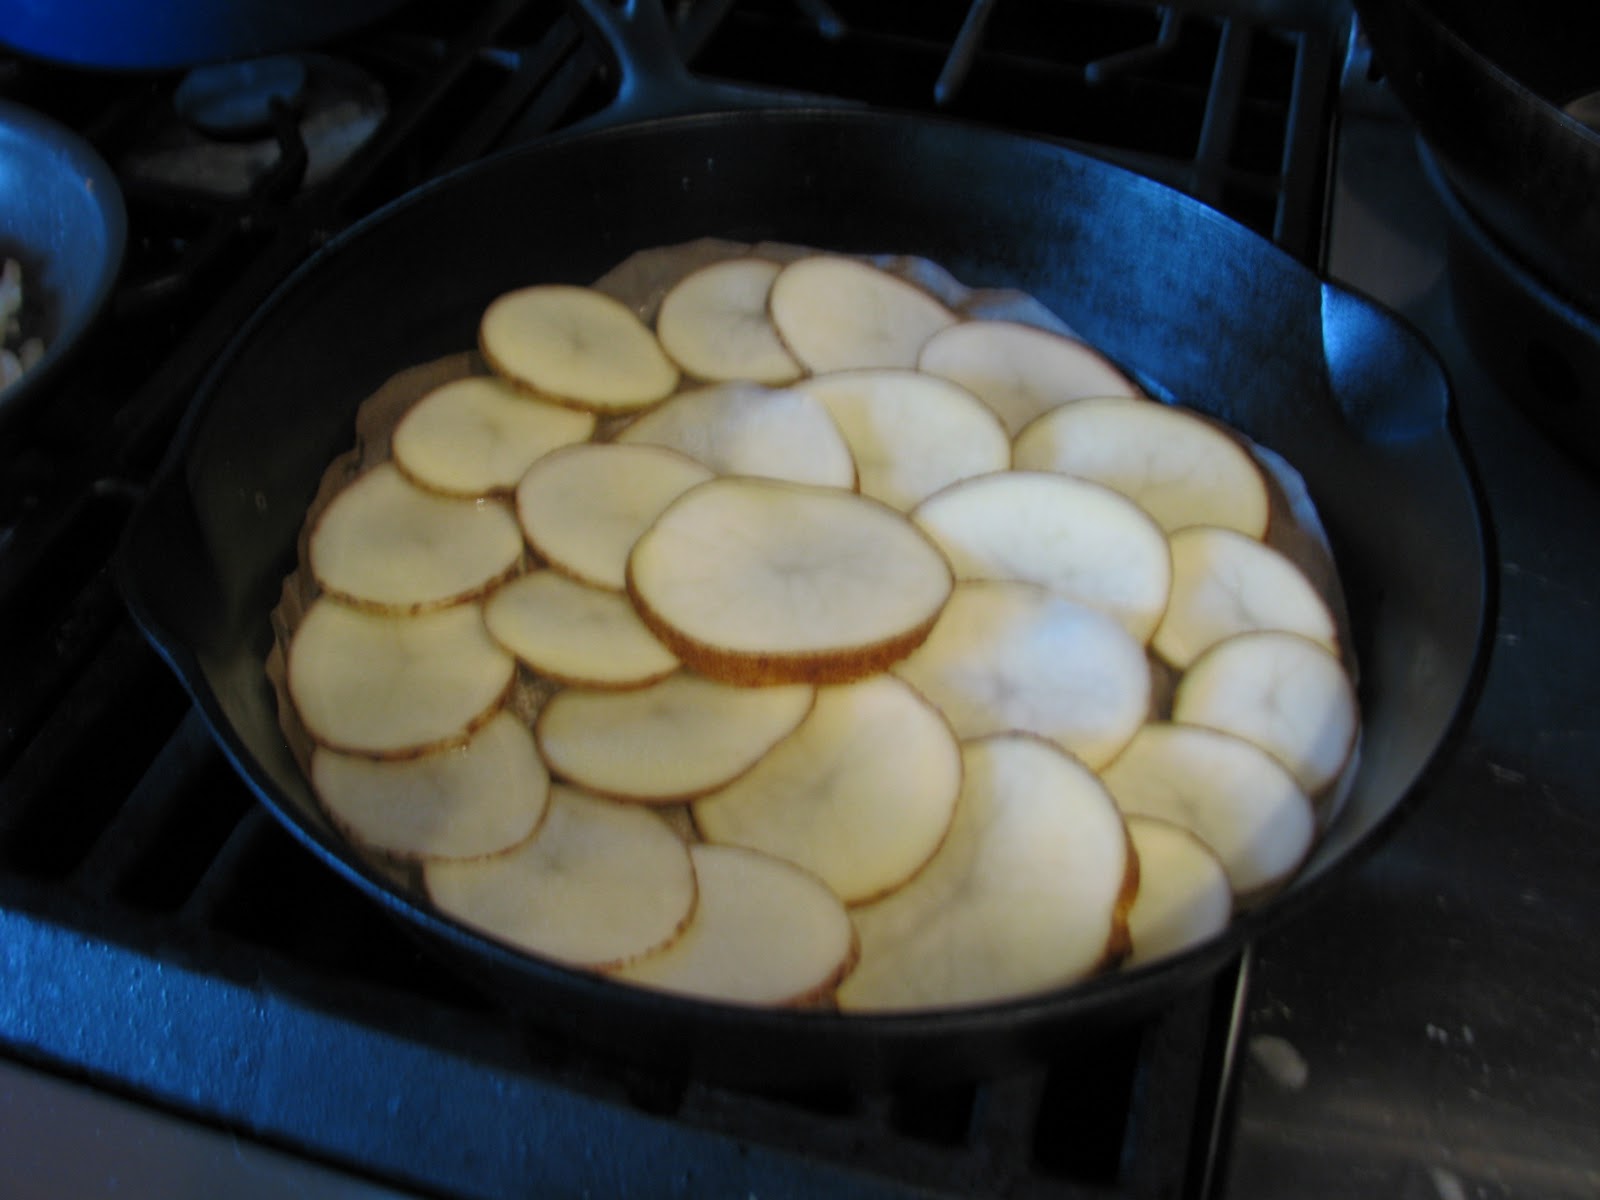
Slice your potatoes in thin round slices, putting the russet slices in a bowl of hot water.  Don't worry if your slices aren't perfect; you will use the best ones for the top and then the rest will not really be visible.

Line a large cast iron skillet with parchment paper.  Turn on the pan and melt 1 T of butter on the parchment paper.  Turn off the pan.  The parchment paper is a key part of flipping the gratin when it is finished.


Layer russet potatoes in the bottom of the pan, arranging them in a circular pattern.  This will be the top of your gratin, so use your prettiest slices for this layer.  Lightly sprinkle with salt and onion powder.


Next, layer half of the sweet potatoes and half the onions in the pan as evenly as possible.


Finish your layers with russets, salt and onion powder, followed by another later of sweet potatoes and finished finally with a final layer of russets.  Drizzle the cream over the top and distribute the last T of butter over the top.  Put a round of parchment over the top and bake with another oven safe pan on the top as a weight.


Bake for 1 hour and 15 minutes at 400 degrees.  Allow to cool for 15 minutes.  Run a knife or spatula around the edges to loosen, and flip onto a platter to serve.

I have found that a serrated bread knife works best to cut this dish into perfect wedges. 


Enjoy!

Tuesday, September 13, 2011

Strawberry Fennel Salad


This salad was a wonderfully light and sweet salad with a crunch that would make a delicious accompaniment to any savory meal.

Put any young tender lettuce in your salad bowl and top with:

thinly sliced hothouse cucumbers
5 thinly sliced strawberries
About 1/4 cup shaved raw fennel root
1 green onion, tops only, chopped


Drizzle with Honey White Balsamic Vinaigrette to taste:

whisk
1 Tablespoon honey
3 T White Balsamic Vinegar
a pinch of salt

Briskly whisk in, a drizzle at a time:
6 T Canola, Grapeseed, or Vegetable oil

Enjoy!

Saturday, August 13, 2011

Spanish Rice Risotto

So, I've got to admit, I'm not a huge Spanish rice fan.  I mean, it's good and all, but I won't go and do jumping jacks over it or anything.  Risotto on the other hand?  Now THAT is good rice.  While making dinner the other night I though, hmmm, if Risotto is delicious and Spanish rice could use a little help, let me try to combine the two.  The result was delicious!  Here is how I did it:

Rice:
1 1/2 cups arborio rice
1 T olive oil
1/2 finely chopped onion
1 clove crushed garlic
1/2 tsp salt
1/4 tsp cumin
a sprinkle or two or three of Cumin to taste

Broth:
6-7 cups of broth/stock (if stock, you may need more salt)
1 can tomato paste
a splash or two tequila (optional)

Finishing:
1/3 cup sour cream
1/4 cup chopped green onions
1/3 cup grated queso fresco


First, combine your stock and tomato paste and bring to a simmer.


Start the rice by lightly toasting the arborio rice with your onions and olive oil.  The rice is ready when you start to see a light brown toasty color on at least half of the grains of rice.  You will also notice the rice grains becoming slightly translucent.  Add the cumin, salt, garlic and chipotle and allow to become fragrant.


As is the case with any risotto, add the broth about 1 cup at a time, stirring upon addition and allowing to simmer uncovered until more liquid is needed.  I have included two videos below.  The first shows what the risotto should look like right after an addition of broth.  The second shows what it should look like just before more broth is added.


If, as you draw your spoon through the risotto, it falls immediately back in place, allow it to keep cooking.  If it is slow moving and allows you to see the bottom of the pan, it is time to add more broth.

Continue adding on cup of broth at a time until you have added 5 cups.  At that point, begin testing the risotto for a soft, but still al dente texture.


When your risotto has reached the desired consistency, add a bit more broth to loosen it and the sour cream once you have turned off the heat.  Put into a serving dish, preferably a large shallow dish and garnish with the cheese and green onions.  Serve!


I hope you enjoy!

P.S. If you want to make your risotto a little in advance, remove from heat when it is almost done, and allow it to sit until you are ready to serve.  Heat, add broth to bring to desired consistency, finish and serve.

Tuesday, July 12, 2011

Potato Potato

1.  Mashed potatoes, hash browns, and potatoes au gratin are not exactly "light" fare.

2.  During the late 90's, many sweet potato farmers were on the verge of growing something else.  After all, the only time anyone ever ate sweet potatoes was on Thanksgiving when they had all the flavor boiled out of them and then were coated in a heavy layer of butter and sugar.

3.  People realized that sweet potatoes are amazing.  They taste great and they are incredibly good for you.


When I was growing up, a fairly common breakfast was sweet potatoes that had been slow baked over night.  The sugar had caramelized, the potatoes were soft.  They made an amazing breakfast!

I have done many many things with sweet potatoes over the years.  They are great cubed and par-cooked in salad.  They rock the house as a side lightly mashed with cranberries, caramelized onions and toasted pecans.  They are incredible grilled on the stove top or out on the barbecue.  At the same time, sometimes they are a bit too intensely flavored for my taste buds that day.  A couple of years ago, I was inspired: what would happen if I mixed sweet potatoes with good old fashioned russets?

Magic.  Magic happened.

Sweet potato and potato mash.  Sweet potato and potato twice baked.  Sweet potato and potato hash browns.  Sweet potato and potato au gratin.  IN-CRED-I-BLE.

So let me tell you about these dishes.  They are lower fat.  Why?  Well, so often, to make potatoes moist and delicious, what do we add?  Cream, butter, oil, milk, cheese.  These are all ingredients that I love, but they don't always love my waistline.  But when I use sweet potatoes along with regular potatoes, there is a higher level of natural moisture present.  In addition, the sweetness of the potato is heightened by the sweet potato.  The addition of the sweet potato also adds a beautiful orange color and a complexity of flavor.

Before you go off and try these, let me make a few suggestions: first, if you are going to cook them for mashed potatoes, steam them above the boiling russets.  Second, if you usually use a lot of cheese in a recipe, back WAAAAY off if you are going to add sweet potato; sauteed onion is a great addition instead.  Lastly, don't parboil your sweet potatoes, even if you are going to do so to your white potatoes; they cook faster and they don't need it.

Lastly, here is a recipe to get you started:


Twice Baked Sweet Potato-Potato

-Bake 4 Russets and 2 Sweet Potatoes
-Gently remove the potato from the skins, leaving shells from the russets behind.
-Rice the potatoes into a bowl (you can just mash them if you don't have a ricer)
-Stir in 1/4 stick melted butter, 1/2 block cream cheese, and 1/2 cup sour cream
-Re-fill the russet shells with the mixture and lightly sprinkle with cheese of your choice.
-Bake at 350-400 for about 10 minutes or until top has melted or lightly browned


Enjoy experimenting!

Tuesday, July 5, 2011

Honey Citrus Glazed Chicken

Ahh, summer, barbecued chicken.  Okay, I must admit, in our family we grill year round.  But I do love summer and the barbecue.  Tonight's dinner was CSA heavy.  I barbecued an organic, locally sourced, pasture raised chicken from here.  I also sauteed kale from a local farm from whom I get a box of produce a few times a month.  Lastly, I used a blood orange from a farmer in San Diego that brings up beautiful citrus and avocados twice a month.

I feel so healthy and supportive of local agriculture!  Okay, I'll stop congratulating myself now.

Anyway, on to the food!


I brined, smoked and grilled the chicken.  At the end of it's time on the grill, I coated it with this glaze:

Juice of 2 limes 
Juice of 1/2 blood orange (regular orange would be a great substitute)
1 T olive oil
2T honey
1/4 tsp chipotle powder
1/2 tsp salt
1 head of finely minced garlic


The skin was perfectly crunchy and brown, the fat was rendered, and the glaze was sweet, spicy and salty.   Mmmm. Yummy.

I even cooked the back, and here is the thing, with a 69 cent per pound chicken I wouldn't.  no way.  not worth it.  nope.  But with a pasture raised chicken, the meat is more expensive, and the best little bits of meat that are on the back have been more developed.  Not only is it worth it, the back is also delicious when the chicken has been raised right.


And as a quick afterthought, the Swiss chard was lightly sauteed in caramelized onions and dressed with the other half of that blood orange. Great side!