Please excuse my absence from food writing. I am expecting baby number two, and frankly, most food just sounds, well, unappetizing. That being the case, I don't think you want to hear about endless bowls of cereal, pickles, or whatever other bizarre foods I am eating to survive right now.
Saturday, December 31, 2011
Saturday, November 19, 2011
Never Too Early
I love to cook. I have for a long, long time. After I made up my first recipe at 7 years old, I only loved it more. Now I have a daughter, a beautiful two and a half year old daughter, and she too loves to cook. "My help, Mama!" "My cook, Mama!" "My do it!"
Last night, we made brownies, and Penelope learned how to lick the spoon, and she learned how wonderful it is to lick the spoon.

Last night, we made brownies, and Penelope learned how to lick the spoon, and she learned how wonderful it is to lick the spoon.

I love her, even if I didn't take her up on the offer to share the brownie battered spoon after she had had her way with it for awhile.
Jalapeño Bourbon Cranberry Sauce

I was inspired by Bobby Flay on Iron Chef a few years ago and this cranberry sauce has become an addition to our yearly Thanksgiving feast. It may sound odd. It may be a bit scary. I encourage you to try it.
Cranberry Bourbon Vanilla Jalapeño Sauce
1 bag cranberries (I like to add a few extras, like a third of a bag or so)
1/3 cup water
2/3 cup bourbon
1 roasted/seeded/de-veined red jalapeño, finely chopped (these are sometimes called fresno chilies)
*I usually taste test my chile to make sure it isn't too hot, but the sugar in the sauce tends to counteract
the heat
1 vanilla bean
1 cup sugar
Thursday, November 17, 2011
Twisted Lebanese Chicken

Tonight, I had some CRAZY ideas running through my head for dinner... when scrounging through the cupboards, this can happen. But my brother and I came up with a plan, and that plan came out well. I love fixing and twisting childhood dishes. Don't you?
Tuesday, November 15, 2011
Asparagus
Man oh man, between teaching and being a mom and other things, I haven't been able to blog much of late. Today's is little, but delicious nonetheless.
Tonight, I was a bit naughty with our vegetables. You see, we had a potato bar for dinner last night, complete with bacon as a topping, so I absconded with the bacon grease. GASP! Not that I'd want to make cooking with that stuff a habit, buuuut...
I had some beautiful asparagus tonight. I wedged an onions, heated the bacon grease, and started the onions cooking. Then, after snapping the tough ends off of the asparagus, I added that to the party. It all cooked for about 8 minutes because the asparagus was on the thicker side. Here it is served:

What is your favorite easy vegetable? Do you do anything to make it special on occasion?
Friday, October 14, 2011
Multigrain Date Pancakes

Now, hopefully, I don't have to convince you to make pancakes from scratch, but if you have never done it, DO IT NOW! No, seriously, the difference in taste is amazing, and the difference in prep time is minimal.
Multigrain Date Pancakes
1 cup flour
1/2 cup rolled multigrain cereal
4 large dates, seeded and roughly chopped
3/4 tsp baking powder
1/4 tsp baking soda
A pinch of salt
3/4 cup sour cream
3/4 cup milk
2 eggs
2 Tbsp. melted butter
Sunday, October 9, 2011
Pizza Breakfast Casserole

The proverbial question: how do you eat your leftover pizza?
For lunch?
For breakfast?
Cold?
Warm?
There are probably many many answers out there. This weekend, I tried out something new. At least new for me.
In a conversation with a friend a few weeks back about what to do with leftover pizza and breakfast, we came up with a brilliant idea. (Which I am SURE has been done before, but neither of us had ever seen it). I was talking about how sometimes we chop up the pizza in the morning and put it in omelettes-- which is delicious by the way. He was talking about how they make that classic breakfast casserole by soaking bread and toppings in egg overnight and baking it in the morning. My brain thought:
breakfast casserole has bread...
pizza has bread...
breakfast casserole needs cheese and other fillings...
pizza has cheese and other toppings...
Hmmmmmmmmmm... ... ... ...
The result?
Tuesday, October 4, 2011
Caramelized Fig & Cognac Liqueur Part 1

If you start now, you can have a rich and deeply flavored fig liqueur for the rest of the year, or for Christmas gifts, or both.
Last year, I tried this out and was blown away by the results. Not only is it good to sip every once in a while, but it makes a great flavoring for whipped cream (like on these French Silk Pies, apple pie and various cocktails. My family was pretty clear that I had to make more this year, and many friends and members of extended family spoke up and requested it for Christmas. The flavor of the caramelized fig melds with the rich flavor of the cognac to create this amazing liqueur. So without further ado...
Supplies:
2 750 ml bottles of cognac
2 additional glass bottles 750-800 ml each (I found these tall glass water bottles at a discount store)
1 lb Black figs
1 lb Green Figs (or double up on the black)
5 cups sugar
Saturday, October 1, 2011
Seafood Boil

I have so many "favorite" meals, and this is definitely one of them. Why is it one of my favorites you might ask? Well, let's see. It is easy to make, easy to eat, delicious, and a cinch to clean up. Who wouldn't love that?
Not only that, but since presentation is everything, I adore the fact that I serve this dish by dumping it on the table. Plus, it will feed 6-8 people!
Ingredients
1 small bag of fingerling potatoes, washed
1 pkg. Kielbasa sausage sliced
10-12 inches Andouille thinly sliced
3 ears of corn, cut into quarters
One large red onion, chunked
(Seafood can be chosen based on taste and availability)
1-1.5 lbs Large Shrimp
20-30 cockles
2 crab clusters broken onto sections
1 large swordfish steak cut into large chunks
Old Bay Seasoning
Sunday, September 25, 2011
Decadence Because I Wanted To

Not for the calorie conscious--
Not for those short on time--
Not for those wary of fat--
But absolutely delicious.
Artichoke Cups with Lemon Butter Mayonnaise

I love artichokes. I have for as long as I can remember. I love them steamed, plain, dipped in butter, fried, in dip, with mayo, for lunch or as an appetizer. Any way they can be cooked, they are delicious. They are also pretty. Don't you think? We are pretty much at the end of fresh artichoke availability, but I had to make them tonight anyway. And I went with a fun presentation. I made homemade mayonnaise and then hollowed out the center, filling it with the mayo.
Delicious!
First, trim and steam your artichokes. I always cut off the tips of the outside leaves with a pair of scissors. Not only does it make the artichokes more attractive, but it makes them less dangerous too!
As your artichokes steam, make your mayonnaise.
Melt 1 stick of butter.
Put one egg yolk, a pinch of salt and a tsp of dijon mustard in a large bowl. Whisk (I like to use a hand mixer) the egg and mustard briskly. Slowly (only a drizzle at a time) add the melted butter, allowing it to emulsify into the egg before adding more. When half of the butter has been added, add the juice of 1/2 a lemon or lime and a sprinkle of Chipotle powder if desired. Finish whisking in the rest of the butter, adding gradually.

You should have a thick and creamy sauce. (If you want a thicker mayo, you will need to add more oil or butter). I have found these proportions to be just right for this application.

When your artichokes are soft but still firm (after 30-45 minutes of steaming), gently pull the leaves out from the center. Remove the center leaves and choke using a teaspoon. Fill the center with about a tablespoon of the mayonnaise and serve!

Enjoy!
Leek, Apple and Fennel Scented Pork Belly with Crispy Skin
Pork belly. Really? So many cuts of pork don't sound that great, but taste so good. This just might be one of those cuts. It takes a while to cook, and a bit more time to prepare than some other cuts of meat, but overall it is pretty easy. Just know that this is not a calorie light meal. I mean, really, this is the same cut of meat we use to make bacon... so you do the math. Still worth it once or twice a year though, I say.
I took a classic technique for pork belly and added my own autumn inspired twist.
two apples
1 large bulb of fennel
2 leeks
pork belly
salt
1/8 cup apple cider vinegar
First, roughly cut your vegetables into large chunks. And arrange them in a baking pan large enough to hold your piece of pork belly.

Use a sharp knife to score the skin of the pork belly every half inch, cutting through the skin, but not all of the way through the meat.

Then, spreading the slices apart with your fingers, sprinkle salt into each cut.


Lightly salt the underside as well, and place, skin side up, over the vegetables. Drizzle the apple cider vinegar over the top of the pork belly. If you are using a metal or glass pan, I would recommend adding 1/4 cup water to the bottom of the pan as well.

Place in a HOT oven. Bake at 450 for 30 minutes, reduce the heat to 350 and continue baking for one hour. If you hear popping and little explosions, that is a good thing! The skin needs to crackle.

Use the juice in the bottom of the pan to drizzle over the meat. Slice on the cuts you have already made and serve.

Enjoy.
Two Potato Gratin (aka pommes anna)

added note: after posting this, I have since learned of a dish called pommes anna that I had never heard of or eaten (but I guess re-created with a twist). This dish is much more of a pommes anna than a gratin, but it is still amazing.
Lightly sweet, perfectly browned, with a hint of caramelized onion, this gratin makes an impressive looking and wonderful tasting accompaniment to any autumn or winter meal. It is fairly easy to prepare, but beware! This one takes some time to bake.
2 Sweet potatoes, scrubbed
3-5 Russet potatoes, scrubbed
1 medium onion
1/3 cup cream
3 T butter
Salt
Onion Powder

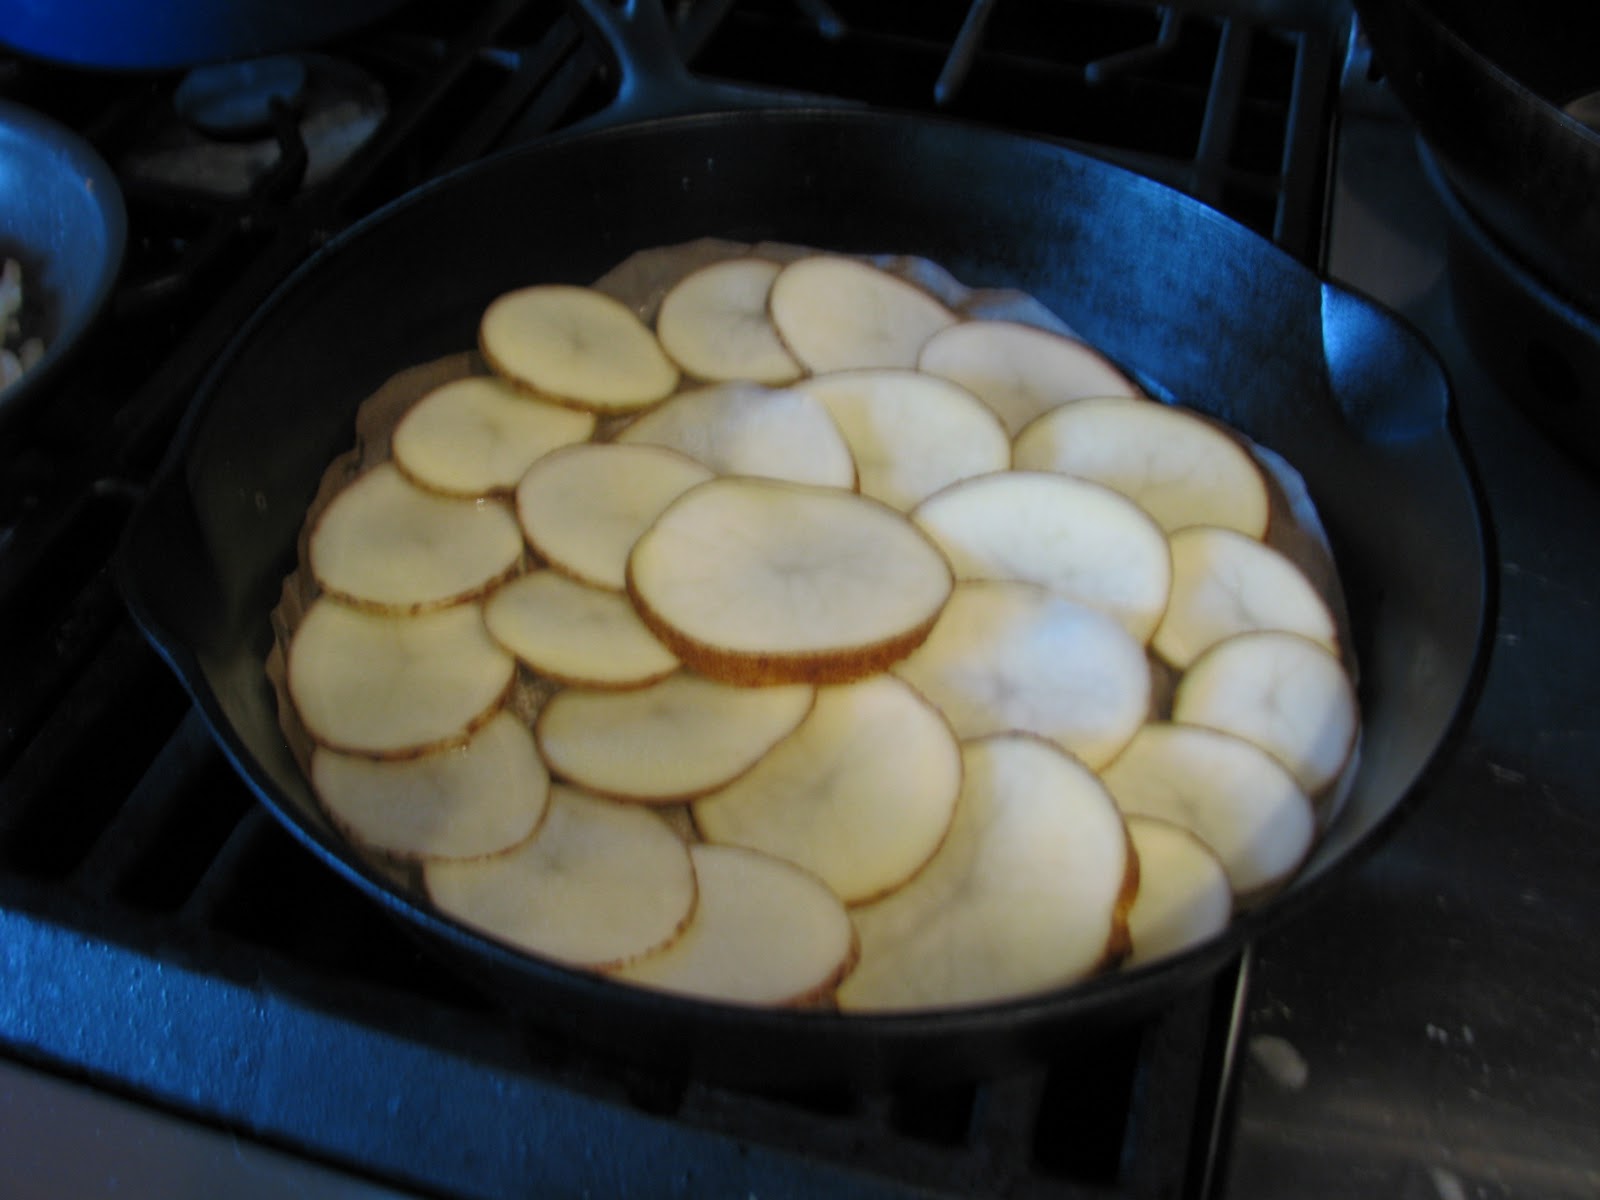
Slice your potatoes in thin round slices, putting the russet slices in a bowl of hot water. Don't worry if your slices aren't perfect; you will use the best ones for the top and then the rest will not really be visible.

Line a large cast iron skillet with parchment paper. Turn on the pan and melt 1 T of butter on the parchment paper. Turn off the pan. The parchment paper is a key part of flipping the gratin when it is finished.

Layer russet potatoes in the bottom of the pan, arranging them in a circular pattern. This will be the top of your gratin, so use your prettiest slices for this layer. Lightly sprinkle with salt and onion powder.
Next, layer half of the sweet potatoes and half the onions in the pan as evenly as possible.

Finish your layers with russets, salt and onion powder, followed by another later of sweet potatoes and finished finally with a final layer of russets. Drizzle the cream over the top and distribute the last T of butter over the top. Put a round of parchment over the top and bake with another oven safe pan on the top as a weight.

Bake for 1 hour and 15 minutes at 400 degrees. Allow to cool for 15 minutes. Run a knife or spatula around the edges to loosen, and flip onto a platter to serve.
I have found that a serrated bread knife works best to cut this dish into perfect wedges.

Enjoy!
Tuesday, September 20, 2011
A Positive of Winter
One of the few things that I enjoy about the coming winter months and nightfall happening earlier is the ability that gives to have candlelight dinners.
I have so many memories of candlelight dinners. Birthdays, my parents anniversaries, and those begged for candlelight dinners for no reason at all.
The soft light. The cloth napkins. The playing with fire.
Have you had a candlelight dinner lately?
I have so many memories of candlelight dinners. Birthdays, my parents anniversaries, and those begged for candlelight dinners for no reason at all.
The soft light. The cloth napkins. The playing with fire.
Have you had a candlelight dinner lately?
Saturday, September 17, 2011
Mini Chocolate Silk Pies

Decadence is chocolate silk pie. No joke. It is simple, rich, sweet, and calorie rich. But it is worth it.
I have made this a few times with different recipes, and the recipe is always almost exactly the same. This time, I took a bit of creative license and came up with something delicious.
Melt and allow to cool to room temperature:
2 oz. of unsweetened baking chocolate.
Cream until light and fluffy:
1/2 cup butter (salted creates a more complex flavor)
3/4 cup sugar.
Add:
Cooled chocolate
1 tsp vanilla
Add and beat one at a time for five minutes:
2 eggs*
Distribute into 6 mini graham cracker crusts and refrigerate for 2 hours.
Right before serving, whip 1 cup of whipping cream, 1 T powdered sugar, and 2 t of your favorite liqueur. I used a fig cognac liqueur. Put a dollop of whipped cream on each mini-pie.
Use a micro-plane to shave bittersweet chocolate over the top of each. Serve. Enjoy.

*If you are concerned about using raw egg, you can pasteurize your eggs by following this process. Be careful to follow it exactly, or your eggs will cook!
Tuesday, September 13, 2011
Full Circle: Caper and Beef Toast
When I lived in Denmark during college, I cooked. Often. I get comfort from cooking, and I was blessed to live with a woman, now a close friend, who was more than happy to share her kitchen with me. I think I left the country knowing, in Danish over 100 food names... and not much else.
Anyway, the woman I lived with, whom my daughter now calls "Gramma Tina, " taught me how to make a few things, one of which was beef and caper toast. She learned it from a friend who had learned how to make it as a nanny in the United States. And I have brought it back again. Today I'd like to share it with you.
Until this simple dish, I was not a huge caper fan, but their tangy saltiness is the perfect foil for the beef and onion, and all f the ingredients work together to make heaven in your mouth. So, without further ado:
Caper and Beef Toasts
First, in a bowl, mix until just combined:
1 lb. lean ground beef (the leaner the better in this case)
1/2 large onion chopped
1/4 cup capers (or more)
1/4 tsp salt
pepper to taste
1 raw egg


We use gloves in our house, not because meat is gross, but because it is cleaner feeling:


 Serve hot with your favorite soup and/or salad. We had ours with this Strawberry Fennel salad, and it was great!
Anyway, the woman I lived with, whom my daughter now calls "Gramma Tina, " taught me how to make a few things, one of which was beef and caper toast. She learned it from a friend who had learned how to make it as a nanny in the United States. And I have brought it back again. Today I'd like to share it with you.
Until this simple dish, I was not a huge caper fan, but their tangy saltiness is the perfect foil for the beef and onion, and all f the ingredients work together to make heaven in your mouth. So, without further ado:
Caper and Beef Toasts
First, in a bowl, mix until just combined:
1 lb. lean ground beef (the leaner the better in this case)
1/2 large onion chopped
1/4 cup capers (or more)
1/4 tsp salt
pepper to taste
1 raw egg


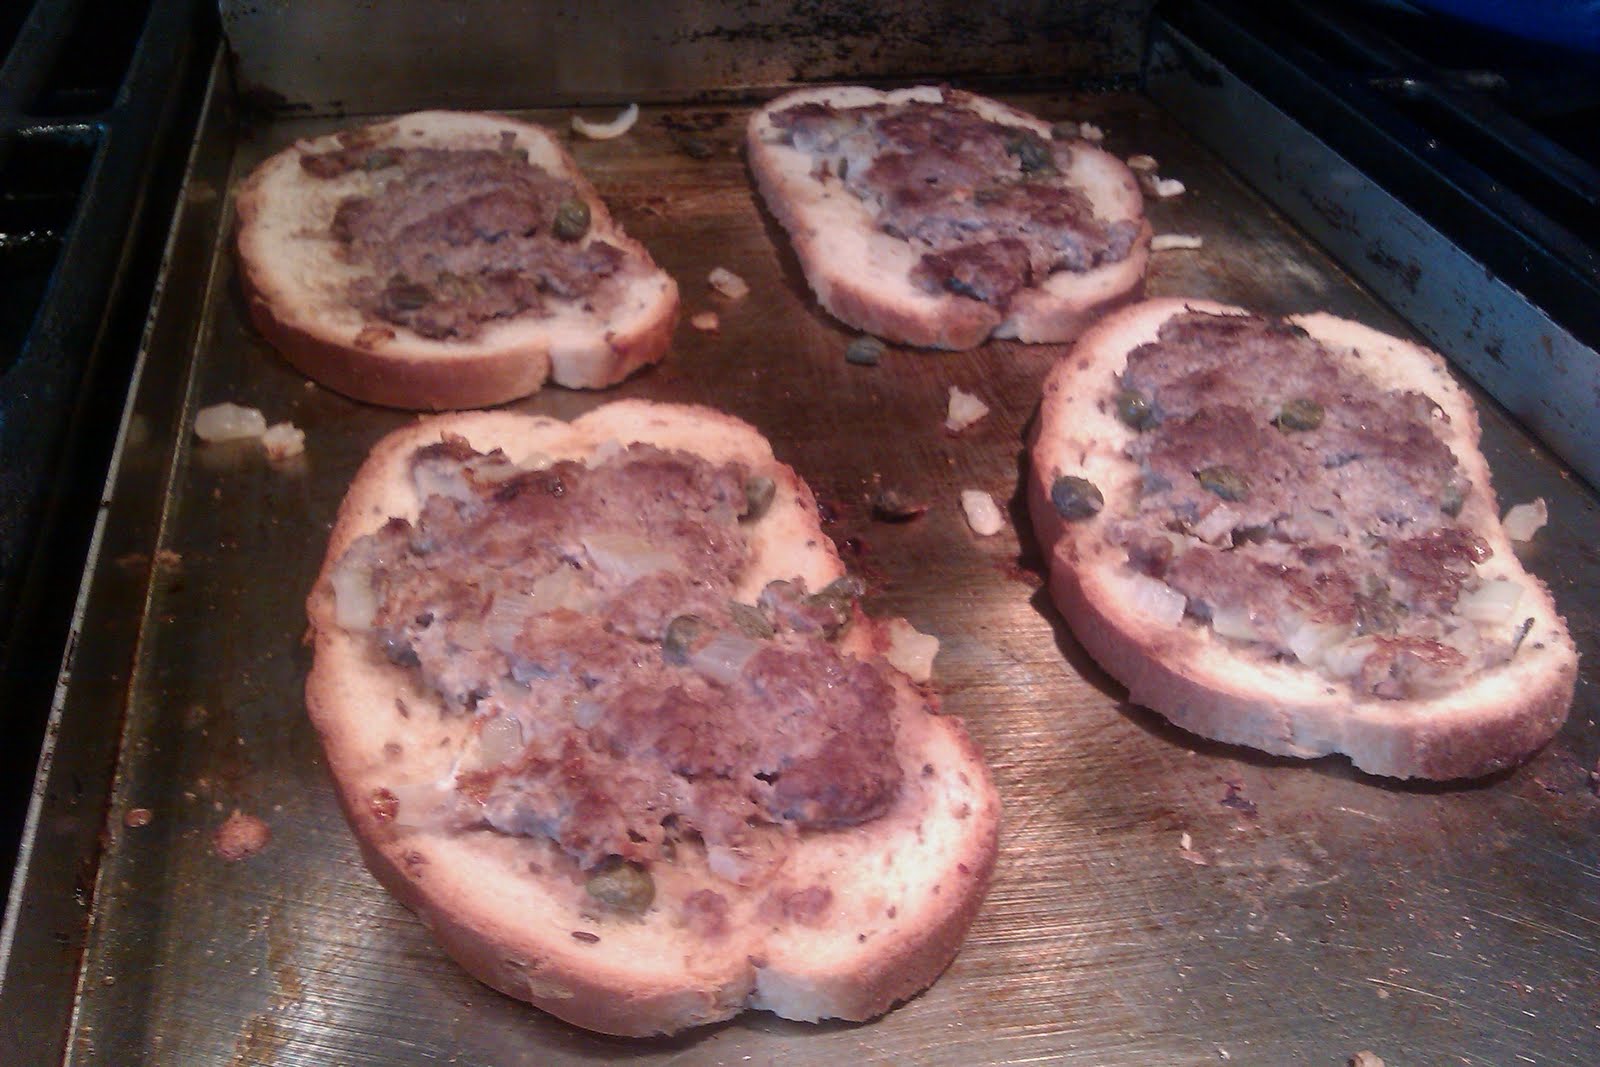
Lay out 8 pieces of bread. We have found sourdough and rye to be the most delicious, but your favorite bread would work great too!

Equally portion the meat mixture onto the bread, and then spread it out evenly over the entire piece of bread.

Preheat your griddle(s) over medium/low heat and place your bread, meat side down on the pan(s).

Allow to brown, for about 5-7 minutes, until the meat has a nice brown color. Flip and allow the bread to toast on the griddle.
 Serve hot with your favorite soup and/or salad. We had ours with this Strawberry Fennel salad, and it was great!
Enjoy!
Strawberry Fennel Salad

This salad was a wonderfully light and sweet salad with a crunch that would make a delicious accompaniment to any savory meal.
Put any young tender lettuce in your salad bowl and top with:
thinly sliced hothouse cucumbers
5 thinly sliced strawberries
About 1/4 cup shaved raw fennel root
1 green onion, tops only, chopped
Drizzle with Honey White Balsamic Vinaigrette to taste:
whisk
1 Tablespoon honey
3 T White Balsamic Vinegar
a pinch of salt
Briskly whisk in, a drizzle at a time:
6 T Canola, Grapeseed, or Vegetable oil
Enjoy!
Friday, August 19, 2011
Dinner Tonight
 |
| Caprese Salad with homegrown tomatoes and basil and fresh mozarella, drizzled with olive oil and balsamic and sprinkled with salt |
 |
| Homemade crab and pancetta raviolis, cheese raviolis and heirloom tomatoes |
 |
| garlic infused oil toasted on rustic bread slices |
 |
| The sauce was garlic and oil with basil chiffonade and heirloom tomatoes added as it was removed from the heat. |
 |
| Homemade Caesar with a lime caesar dressing (substitute lime for lemon in any caesar dressing... yummmm) |
Saturday, August 13, 2011
Spanish Rice Risotto

Rice:
1 1/2 cups arborio rice
1 T olive oil
1/2 finely chopped onion
1 clove crushed garlic
1/2 tsp salt
1/4 tsp cumin
a sprinkle or two or three of Cumin to taste
Broth:
6-7 cups of broth/stock (if stock, you may need more salt)
1 can tomato paste
a splash or two tequila (optional)
Finishing:
1/3 cup sour cream
1/4 cup chopped green onions
1/3 cup grated queso fresco
First, combine your stock and tomato paste and bring to a simmer.

Start the rice by lightly toasting the arborio rice with your onions and olive oil. The rice is ready when you start to see a light brown toasty color on at least half of the grains of rice. You will also notice the rice grains becoming slightly translucent. Add the cumin, salt, garlic and chipotle and allow to become fragrant.

As is the case with any risotto, add the broth about 1 cup at a time, stirring upon addition and allowing to simmer uncovered until more liquid is needed. I have included two videos below. The first shows what the risotto should look like right after an addition of broth. The second shows what it should look like just before more broth is added.
If, as you draw your spoon through the risotto, it falls immediately back in place, allow it to keep cooking. If it is slow moving and allows you to see the bottom of the pan, it is time to add more broth.
Continue adding on cup of broth at a time until you have added 5 cups. At that point, begin testing the risotto for a soft, but still al dente texture.

When your risotto has reached the desired consistency, add a bit more broth to loosen it and the sour cream once you have turned off the heat. Put into a serving dish, preferably a large shallow dish and garnish with the cheese and green onions. Serve!


I hope you enjoy!
P.S. If you want to make your risotto a little in advance, remove from heat when it is almost done, and allow it to sit until you are ready to serve. Heat, add broth to bring to desired consistency, finish and serve.
Subscribe to:
Posts (Atom)